Docker for Data Science, Efficient Image Instancing without System Issues
Covering how and why you should setup Docker for your local environment when developing Machine Learning models and products
What is Docker? Why do I love it? And why should you suddenly worship the Almighty Whale?
Ishmael once set out to conquer the seas by taking down the leviathan: Moby Dick. The unkillable being that haunted the seas. However, in his endevour, he failed. The Whale completely destroying his ship and crew, leaving him as the sole survivor.
But have we ever stopped and thought: should we instead be worshiping this Whale? Is it too strong for mortal man? And how can we do so, and what gifts will it bring forth?
Too weird? Too weird. Anyways, back on topic to somewhat whale-related things.
Docker is a containerization platform.
What does this mean? Let’s do some quick introductions.
Some of you may be familiar with the concept of a Virtual Machine (VM). These VM’s are often ran to boot Linux onto your Windows machine and work in an environment that has mild access to your internal system. What can get annoying very quickly with VM’s however is they require a hefty amount of system resources to be used, even if you might not get through all of it. Typically you have to direct the virtual machine to allocate X Gb of memory for you to use, X Gb of storage for it to utilize, and so forth. Limiting how much you can do.
The result? Running over 3 virtual machines in a standard environment is near impossible to run efficiently.
Alright, what about a “container”? Containers are a light-weight infrastructure that runs atop your current environment. It doesn’t have it’s own allocation in memory, and so it shares directly with what your system is doing.
The result?
You can quite easily spin up and run hundreds of low-resource intensive Docker images at once, have them do their jobs, and then shut down, without too much headache. (Think something along the lines of run a shell script that writes to a random txt document 1,000 times: low intensive).
The image below is a good visualization of this, taken from the Virtual machines vs Docker Containers YouTube video:
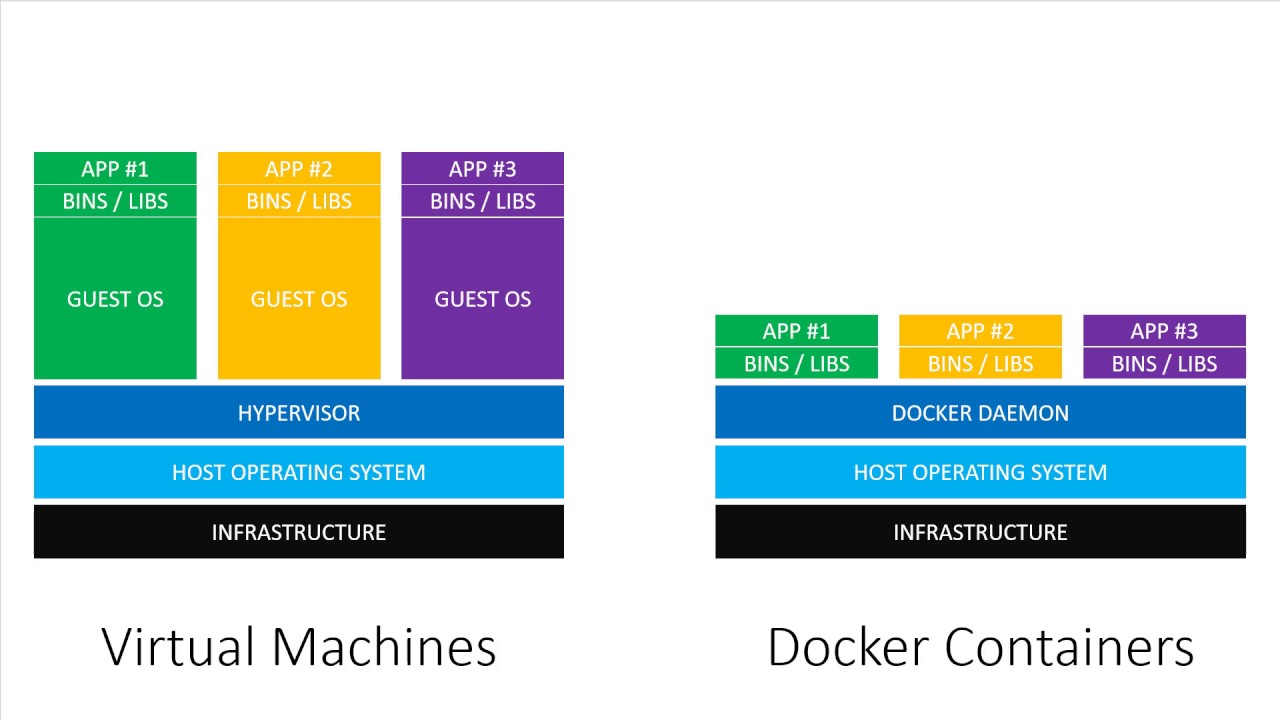
You can see that while both the VM and the Docker containers require underlying infrastructure and a base host operating system (think what your every day environment is on your computer), VM’s require their own explicit Guest OS’s to be installed, while Docker containers are just a thin layer that lives within the Docker Daemon.
As a result, the containers are extremely lightweight, typically don’t step on each others toes, and are quite efficient.
Moving on, what does this have to do with Data Science?
This sounds like quite a bit of DevOps work, doesn’t it? (That’s because it is!) Let’s try and tie this back into our world of Data Science and Machine Learning.
Setting up a local environment (be it GPU enabled or not) is one of the most frustrating aspects of our field. You can follow a million tutorials and still not get it right. God forbid you mess up your conda environment too, and then you’re really in a pickle.
The nice thing about these Docker containers is so long as we supply it with the right underlying hardware to use (yes, that means we’ll be covering installing CUDA and whatnot sadly), managing your environment is as simple as throwing up a new Docker image. But what if I break that environment? Rebuild it. I don’t lose my data (if we configure it properly), and I can just say goodbye to that environment configuration and start anew.
We get access to this capability through a shared resource called the Docker Hub. Through here, we can host our own pre-built Docker configurations and can run them on our local machines!
Important Notice: We will not be talking about writing Dockerfile’s here. We will be discussing utilizing them instead. For a good tutorial/curriculum, my course I took in school utilized Docker 101, and here’s a good best practices reference
Awesome, so how do I setup my environment?
I’ll be following you through the exact same steps it took me to setup my new MSI Laptop, which came with a NVIDIA GPU attached with it. It’ll be a process, with many links, but it should not take you more than 30 minutes in total!
This will be the shortest part of this article, due to quite ltierally how quick this was. So, ready? Let’s get started!
Downloading Ubuntu
First step is (if you so choose) installing Ubuntu onto your machine. I did because I wanted the entire seperated operating system, but do note: this is not required. I didn’t want to deal with any thoroughput issues with WSL2, and I like staying on Windows 10, so this was the other main reason why I just went ahead with rolling Ubuntu.
You will need a thumb drive of some form for this, as we will be making a bootable image to install from.
First: Download and install Rufus.
Afterwards, navigate to the Ubuntu Desktop homepage. Download the ISO, open it in Rufus, and hit START.
It should prompt you saying we’ll completely wipe that thumb drive, that’s expected, then wait for it to finish.
Once that is done, I’d personally recommend allocating a chunk of your hard drive to be your Linux partition.
Considering I do a solid 50/50 of my work between Windows and Ubuntu, I just left half of my hard drive partitioned. Read how to do so here > Note: Do not choose to allocate the storage as an NTFS drive, leave it directly unallocated. Ubuntu can’t utilize NTFS drives for booting
Installing Ubuntu
Next, you’ll want to install Ubuntu. Word of advice: bring this article up on your phone so you can keep reading. As during it, you won’t have access to your computer.
You will need: - Your laptop, turned off - Our newly-made image installer on our thumb drive - An Ethernet cable.
Yes, you heard me: an Ethernet cable. Even if you’re doing this through your laptop, you’ll want one.
Out-of-the-box, Linux will likely not support your wireless card, and we’ll hit a switch during install to get that.
Alright, are we all set? Great.
Boot up your computer and open your BIOS (Google it for your laptop brand, for some it’s F7, F9, or even Delete).
Once there, you’ll want to navigate to the Boot section, and find the Boot Order. If your BIOS supports you directly booting off of some hardware, navigate to your USB Bus (it should say Ubuntu on it), and hit “Boot”. If not, adjust the boot order to start with our little thumb drive, and then hit the “Save and Exit” button.
Upon restarting, you should be on a new prompt asking you what you want to start in. You will get extremely familiar with the GNOME prompt, as it is what will handle telling your computer to either boot in Windows or Ubuntu. Here you just want to press the “Try Ubuntu” option (the first).
After it boots, you should see on your desktop a “Install Ubuntu XYZ” shortcut, go ahead and click that to start installing it. > Note: I had some issues with Ubuntu being laggy, it was just due to this preview. It went away post installation
More or less just follow along the directions. HOWEVER: At one point it will prompt you with a radial button saying “Install just what I need”, with another option saying install 3rd-party drivers.
For the love of everything, hit that button (this is step You need to install 3rd-party drivers to have access to bluetooth, internet, and a slew of other things. So do it.
Wait about 10-15 minutes if that for it to install, and you should have a functioning Linux install!
Now boot up your new Ubuntu OS, and we can begin the fun!
Installing NVIDIA and the Drivers
We’re at the scary part now, installing the drivers. Follow this tutorial exactly and you will be fine. Ensure you find the right driver for your GPU, by looking here.
I had heard a rumour in a tweet that Ubuntu enjoyed eating up our GPU RAM for rendering our screen. That’s not good! I want as much VRAM as I can for running ML!
Is there a solution? Of course. And here it is on a silver platter:
A wonderful little gist on Setting up integrated graphics for display
Pretty much follow that gist 1:1, and by the end you will have CUDA installed without hating yourself. Below are a few important notes I’ll highlight:
The path to the xorg.conf file should be /etc/X11/xorg.conf and not /etx/X11/xorg.conf
And especially this post by @scaomath further in the comments:
Thanks for the post. I was able to get the iGPU in 10th gen Intel running using the xorg.conf given, as well as CUDA running VSCode. However, I got all pixelated and weird color strips across the screen. So I did some Google-fu and found that in order that X works on Intel UHD 630 (8th-10th gen desktop CPU). The iGPU part needs to be changed to:
Section "Device"
    Identifier  "Intel Graphics"
    Driver      "modesetting"
    BusID       "PCI:0:2:0"
EndSection
The driver has to be modesetting which is in xserver-xorg-core. Just to be safe, it is recommended to uninstall xserver-xorg-video-intel as well.
I did both, and afterwards I got ~10mb of constant usage out of my monitor from the GPU. Not perfect, but 10mb won’t kill me or my performance too much
Next up: Docker
Okay, that was the hardest part of this entire thing. Seriously.
All that’s left is for you to download Docker-GPU, and we’re ready to rock and roll.
First, follow the docker installation directions from this digital ocean article: - Installation directions
Once that’s done, we’ll follow the directions for installing the CUDA capability for Docker here
Important: Skip the “Setting up Docker” portion, you have already done so.
And, I kid you not, you’re done!
You can quickly test if it’s working by doing the following:
Test: nvidia-smi and make sure your GPU comes up
Run: docker run --rm --gpus all nvidia/cuda:XX.X-base nvidia-smi
(replace XX.X with the CUDA version that showed up in nvidia-smi). you should see the GPU show there as well.
The rest of this article will be covering some basic docker know-how for you to help utilize this great process, as well as some bash shortcuts I’ve made to speed up my development.
Docker: The Basics
In all reality, you need to know about four commands:
docker container listdocker searchdocker pulldocker rundocker kill
Let’s go over each quickly:
docker container list
This command will list all active docker containers and their current status. You can see an example output of mine below:
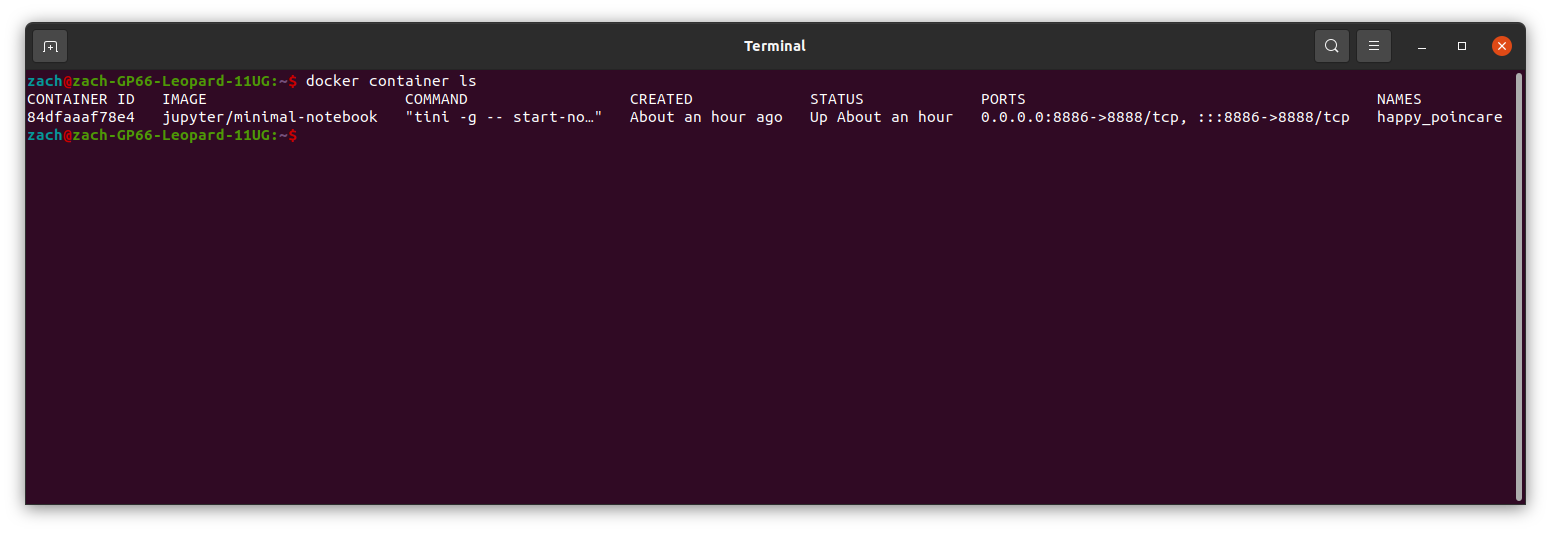
Note: the terminal doesn’t look too pretty or readable here, for now that’s fine. I wrote something to deal with that later.
What’s important to read here: - Names: A nickname for a particular container, when referencing them in docker commands you can either use this or the CONTAINER ID
Image: What the base image of the container is using
Ports: What exposed ports are running that you can connect to (more on this later).
The rest you can look at or see if you need, but these are the three I pay the most attention to (along with Status).
docker search
This is what you (should) be using to find any docker containers you’re interested in running. this will search the Docker Hub and find what you need. Below is an example of me searching for fastai images:
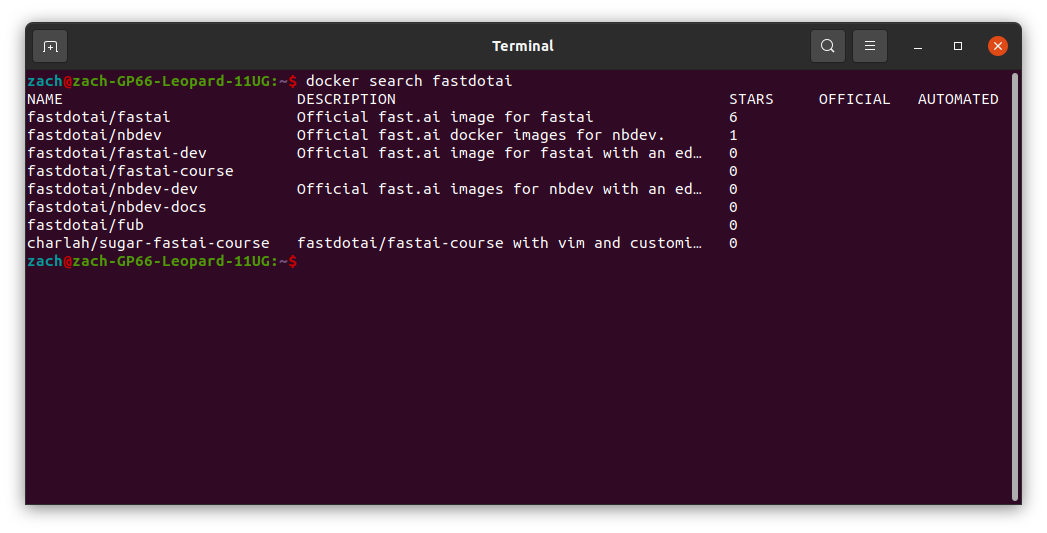
Let’s keep a note of how the official fastai image is fastdotai/fastai. We’ll need this for later.
docker pull
docker pull is what will actually take that docker image on the hub, and bring it to our local device. It’s a fairly straightfoward command as well. To download that fastai image, we do:
docker pull fastdotai/fastai.
That’s about it!
docker run
Docker run is how you will start up most of your docker images. For a full list of parameters you can pass in, see the documentation here, but for our sake I’ll TL;DR the most important ones for you:
-vspecifies a volume for you to mount. It follows the syntax ofpath/on/mine/from/root:/mnt/docker_volume/name, where the latter half of that path is where it appears locally on your docker image. This will directly link to your local system, allowing you to touch your local files directly.
Note: Docker containers mount different file storage systems. Ensure you figure out the direct path it boots up in and then setup your volume there. This will alleviate quite a number of headaches
-pspecifies exposed ports on your system. This is extremely important for say running Jupyter servers inside the image, and wanting to talk with them. Typically they follow a format of-p 8888:8888. The 8888 is the port on your system, and the second 8888 is the port inside the docker image. So, for example if inside the docker image is a server spin-up script, that exposes a jupyter port onlocalhost:8888, we could just leave it be and connect to port 8888. But we run into issues if I try and run two of this image, as the servers would mess with each other. By changing that first port number, we can perform port forwarding, and we will tell the docker container to send all data coming from port 8888 to 8887, something not in use.
Note: Depending on the setup, it may still say “connect to 127.x.x.x:8888”. Remember that this is not the port we exposed, so trust your port changing and go to the right web address
--gpusspecifies the number of GPUs to use. You can specify 1, 2, orall. I typically just use all. This is specific from us installing the CUDA version of docker earlier, so do take note to run your images with--gpusif you’re hoping to make use of your GPU in your system.
If we wanted to run that downloaded image of fastai we grabbed earlier and spin it up in our current working directory, here’s how that would look: (I’ll explain the fancy bash)
docker run $(pwd):/home/runner/$(basename $(pwd)) -p 8888:8888 --gpus all fastdotai/fastai ./run_jupyter.sh
Now, let’s quickly talk about what this does.
pwdgrabs your current working directory, and its full pathbasenametakes the last path in a long path (such as one returned by pwd)
Doing this should now expose a jupyter server running on localhost:8888 (that requires a token), and is utilizing your GPU!
docker kill
Finally, we have the death command: docker kill. With this, you simply specify either the container id from earlier, or the nickname it gave you, and it will immediatly shut it down. An example of shutting down our container from earlier (the nbdev one running in the script) would look like the following:
docker kill happy_poincare
Note: Since we can run multiple containers of the same image, this is the importance of us specifying the nickname affiliated with it
My Secret Sauce
What follows now will be my own secret commands I’ve written up, along with a library, to make my own life easier.
I threw all of these into ./bash_aliases.
When it comes to docker commands, I’m lazy and don’t want to write docker container, so we have the following:
alias dkill="docker kill(kill a container)alias dp="docker pull(pull a container)alias dr="docker run(run a container)
They still maintain their arguments (and respective helps), while also keeping my own sanity.
I also have a few of the following for Python: - alias python=python3 - alias py=python3
Finally, we have some that handle running docker run, but before we get too deep into it, just set the following:
alias start="dr "
By setting a space at the end, we can have it trail off into commands directly below it, which we will utilize. You’ll understand why for semantics I have “start” instead of dr in a moment
Docker Buddy
As I was working my way through this, I didn’t like how some of the outputs looked (very bland, unreadbale). So as a result, I wrote docker_buddy, which utilizes Rich to introduce clean and concise versions of the same commands I just ran earlier.
There are three alternatives in it:
dsfordocker searchdlsfordocker container listdifor inspecting docker containers, I nickname it asdocker investigatein my head (though is not directly docker)
To install:
pip install docker_buddy
And also do:
sudo apt install npm
npm i -g rekcod
For an example of how those help us out, take a quick peek at the images I provided for docker search and docker container list. Here’s our new ones:
Docker Search (ds): 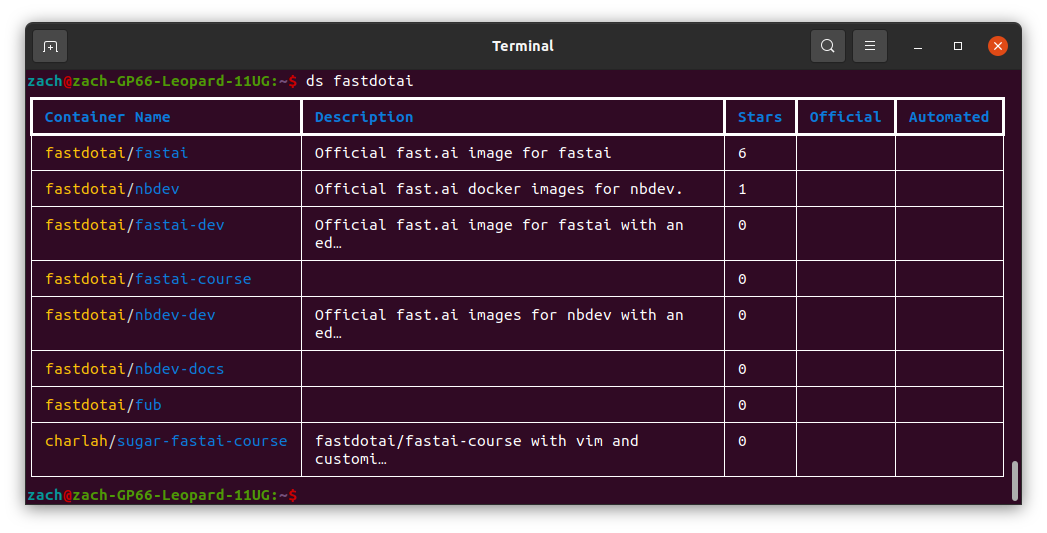
Docker Container List (dls): 
Thanks entirely to Rich, we’re able to pull off this beautiful looking UI.
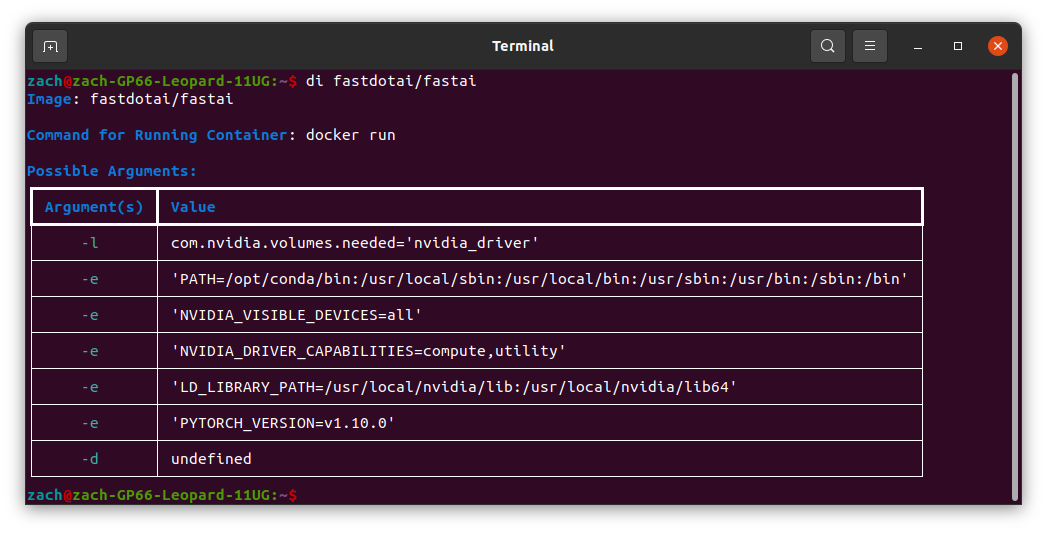
I also wrote di as a way for us to see what inherit arguments are available for the docker image specifically, i.e. their configurations. An example output is below:
Now that we have docker_buddy on our system, here’s those last two cheats I have in my alias:
alias nbdev="-v $(pwd):/home/runner/$(basename $(pwd)) -p 8888:8888 fastdotai/nbdevalias jupyt="-v $(pwd):/home/jovyan/$(basename $(pwd)) -p 8886:8888 jupyter/minimal-notebook
Combined, these all now allow me to quickly do:
start fastaior
start jupytTo skip all of the long configuration setups to start my server. If needed we can of course go through and run them manually, but these are quick shortcuts I wrote for myself.
Conclusion
I truly hope this has helped many of you setup some brand new environemnts, and use CUDA with as minimal headache as possible. The moment I got this working my mind got racing with all the possibilities this could bring, which is what drove me to write this article.
If you’ve enjoyed this, please do let me know!
You can find me on my socials at:
- Twitter: @TheZachMueller
- LinkedIn: Zach Mueller